


Paddy/Rice Farming in India
Learn the best practices for paddy cultivation with clear, field-ready steps you can use right away. From soil prep to storage, this rice farming process helps you save water, time, and money.
Introduction to Rice/Paddy Farming
Discover how rice farming forms the backbone of India's agricultural economy.
Rice feeds millions every day in India, so getting the basics right matters. With careful planning and simple habits, rice cultivation becomes easier and more reliable. Start by picking a variety that suits your weather and water, then prepare the field so it holds moisture well. Keep the surface level, fix bunds, and remove weeds early. These small steps make a big difference later.
The rice farming process is not complicated when you break it into parts: land preparation, seed selection, sowing, water and nutrient care, plant protection, and finally harvest and storage. Use clean seeds, a proper seed rate, and steady spacing. Organic matter, like compost, improves soil and helps roots breathe.
For rice crops in India, farmers grow short to long-duration types, depending on rainfall, canals, or borewells. Choose what fits your season, not just what the neighbour grows. Keep simple notes - dates, inputs, and results. Over time, those notes guide better decisions, lower costs, and improve grain quality.
Importance of Paddy Farming
Paddy farming sustains rural livelihoods and ensures food security for nearly half the world’s population.
Rice supports homes, markets, and the nation. Here are four clear reasons it matters and how good practices help:
Food security and steady plates
Rice remains a daily staple for most families across regions. When harvests stay stable, prices remain fair, and grain stocks reach schools and relief centres on time. Local paddy production reduces import pressure and builds confidence during festivals and lean seasons alike.
More rural jobs
Each stage of paddy farming, from seedbed preparation to milling, creates steady employment. Labourers, machine operators, transporters, and small traders all find work opportunities. A strong rice economy boosts community participation, skill growth, and regional development across rural areas.
Better income
As productivity rises, more cash circulates within the village economy. Families earn extra to save for future needs, support children’s education, and meet medical expenses calmly. With reliable harvests, household stability improves, strengthening both family and community wellbeing.
Better use of water and land
Timely weeding, balanced fertilisers, and precise field levelling make water use more efficient. Even during dry spells, smart farming practices help crops thrive without waste. Over time, the soil structure strengthens, the land stays fertile, and productivity endures for years.
Rice/Paddy Farming Cultivation Process
Rice farming is a step-by-step process, and from land preparation to harvesting, every stage of paddy cultivation requires patience, precision, and resource management.
This section covers practical rice sowing methods and innovative techniques to follow. Let’s uncover them.
1. Land Preparation
Repair the bunds so that you can stop leaks and control the water depth. In many places, puddling the wet soil helps to lock in moisture, and it also keeps the level of weeds down.
- First, you need to clear the weeds and leftover stubble.
- After that, you must till the soil until it’s crumbly. This will help the roots to spread easily.
- Then, you need to level the field carefully. If there are uneven patches, it will waste water and create weak spots.
2. Seed Selection
When it comes to irrigation for rice techniques, pick varieties that match your rainfall window, temperatures, and disease risks. Short-duration types fit tight monsoons; longer ones suit steady irrigation.
- Use certified or truthful seeds with high germination. Choose disease- and pest-tolerant lines to cut sprays.
- Do a quick salt-water test to remove light, bad seeds.
- Treat seeds before sowing to prevent seed-borne problems. If trying a new variety, plant a small test strip first.
- Uniform, healthy seed gives even tillers, fewer gaps, and cleaner grain.
3. Sowing Methods
Choose a method that fits your labour, tools, and water. Direct seeding (dry or wet) saves labour but needs early weed control and steady moisture.
- Transplanting uses a nursery for 20–25 days, then moves seedlings to the main field; spacing is easier, and early weeds are fewer.
- Keep spacing consistent to avoid weak, crowded plants. Some farmers use SRI: young seedlings, wider spacing, and intermittent watering.
- Whatever you pick, aim for the right seed rate, proper depth, and a clean nursery so seedlings start strong.
4. Irrigation
Water is vital, but deep flooding is not. After establishment, keep a shallow layer (about 2–5 cm) so roots breathe and nutrients stay available.
- Many farmers follow alternate wetting and drying: let water recede until fine soil cracks appear, then irrigate again.
- This saves water, supports root health, and can reduce methane. Never stress plants at flowering and grain filling.
- Keep inlets and outlets clear so you can quickly drain excess rain. Simple tools like a field tube help you track the water table and avoid guesswork.
5. Fertilization
Base your plan on a soil test and local advice. Rice needs a balance: nitrogen for leaf growth and tillers, phosphorus for roots, and potassium for strength and disease tolerance.
- Split nitrogen into 2–3 doses - at planting, tillering, and panicle initiation - to match crop demand. Watch for micronutrient gaps like zinc; pale leaves often signal issues.
- Mix organic inputs (compost, green manure) with mineral fertilisers to feed soil life and hold moisture. Keep notes on dates and amounts so you can fine-tune next season.
6. Pest & Disease Management
Walk your field every week. Early signs are cheaper to fix. Common pests include stem borer, leaf folder, and brown planthopper; major diseases include blast and bacterial leaf blight.
- Encourage helpful insects by avoiding harsh early sprays and choosing targeted products.
- Keep weeds down, manage water if planthoppers rise, and avoid excess nitrogen that invites trouble.
- Seed treatment and resistant varieties are low-cost, high-impact shields. Always follow label directions and local advisories.
7 .Harvesting & Post-Harvest
Harvest when most grains are hard and the straw turns golden. Cut on time to reduce shattering and broken grains.
- Use tools that fit your setup - sickles, reapers, or combines - and adjust height for clean cuttings.
- Dry grain soon after cutting to about 12–14% moisture. Use clean tarps, turn the grain often, and keep it off bare soil.
- Clean and grade to remove stones and chaff. Store in dry, tight bags or bins on pallets, away from walls, with good airflow.
- Checking moisture and sealing stores - protect your season’s hard work.
Right Time and Soil for Rice/Paddy Farming
The ideal time for rice or paddy farming is during the monsoon season when the soil retains enough moisture for growth.

Ideal Season for Paddy Cultivation
Paddy fits into three main seasons across India: monsoon (kharif), winter (rabi), and summer (boro). Your best season depends on rain, canal supply, groundwater, and the rice variety you choose. The aim is to sow or transplant when the field can hold water and the temperature stays warm.
- Monsoon (Kharif): Nursery in June–July, transplant in July–August, harvest in October–November.
- Winter (Rabi): Nursery in November–December, transplant in December–January, harvest in March–April.
- Summer (Boro/Coastal): Nursery in January–February, transplant in February–March, harvest in May–June.
Important Tips for Choosing the Right Season
- Match your variety duration to the season length. Short-duration varieties (100–120 days) work well where the monsoon is short or water is limited.
- Watch local signs, not just the calendar. Start the nursery when pre-monsoon showers have settled the dust and day temperatures are warm.
- Keep a simple record: nursery date, transplant date, and expected harvest week. This helps you plan inputs, labour, and machinery.
Soil Requirements for Paddy Farming
Fertile alluvial soil with good water-holding capacity and moderate acidity ensures healthy rice plants and high yields.
- Rice likes soils that can hold water without losing it quickly. Clay loam and silt loam are ideal because they keep moisture, support strong roots, and allow puddling. Sandy soils can grow paddy, but they need more frequent irrigation and more organic matter to hold water. Very heavy clays can crack in summer; firm bunds and timely irrigation help manage that.
- Aim for a soil pH between 5.5 and 7.5. If your soil is acidic (low pH), apply lime as per a basic soil test. If it is alkaline or sodic, gypsum helps reclaim the structure. Zinc deficiency is common in rice fields, especially after puddling; apply zinc once you see pale new leaves or as per local advice. Add farmyard manure, compost, or green manure before puddling to build soil life and improve structure.
- Simple checks tell you a lot. Squeeze damp soil in your palm: if it forms a smooth ball that holds shape but breaks with a tap, it is close to loam. Push a stick into wet soil: if it sinks slowly and stands firm, the soil has good body for paddy. Fill a small tin with water and press it into the soil; if the water level drops very fast, the soil is too porous and needs more puddling or organic matter.
- Level the field well. High and low patches waste water and create uneven growth. Repair bunds so you can keep a shallow water layer when needed. Good inlets and outlets let you drain rainfall quickly or add water during dry spells. In reclaimed or coastal areas, check for salinity; rinse fields with fresh water before transplanting if EC is high, and pick salt-tolerant varieties if salinity persists.
- Do not over-till. Too many passes break soil into powder and create hard pans. Two to three well-timed tillage operations, plus puddling in monsoon rice, are enough in most fields. Return rice straw as compost if you can; it recycles nutrients and improves soil sponginess. Healthy soil holds water, feeds roots, and reduces input costs over time.
Weather Conditions
- Paddy is a warm-season crop
It grows best when days are warm and nights are mild. For germination and early growth, temperatures around 25–35°C are comfortable. At tillering, steady warmth pushes new shoots. The most sensitive time is flowering; very high heat or sudden cold can reduce grain setting, so try to avoid these extremes during that stage.
- Even rainfall is more important than total rainfall
Paddy can grow with less rain if you manage irrigation well, and it can still fail with high rain if floods linger. Plan fields so excess water can drain within a day or two, especially during flowering and grain filling. Where rains are irregular, use alternate wetting and drying: let water recede until fine cracks appear, then irrigate again.
- Humidity helps paddy, but can also invite disease
Long spells of cloudy, wet weather may increase blast and bacterial blight. Keep spacing right for airflow, avoid heavy late nitrogen, and watch fields after a storm. Warm, still evenings are good for flowering; strong, hot winds at midday can cause sterility. If a heat wave is forecast during flowering, raise the water depth slightly and avoid field operations that stress the crop.
- ● Use simple tools to read your weather
A basic rain gauge and a small notebook can guide irrigation timing. Check local farm advisories on your phone for warnings about heavy rain, heat, or pests. In flood-prone belts, choose submergence-tolerant varieties and plant on a schedule that avoids peak flood weeks. In drought-prone areas, prefer short-duration types and plan one assured irrigation around flowering.
Traditional Vs Modern Rice/Paddy Farming
While traditional methods rely on manual labour and natural irrigation, modern rice farming embraces scientific practices.
What is Traditional Rice/Paddy Farming?
Traditional rice farming usually means raising seedlings in a nursery and then transplanting them by hand into a puddled, levelled field, which helps control weeds but needs more labour and time. Farmers use less seed but spend many person-days on planting because manual transplanting takes effort and care in wet soil.

- In many Asian regions, most fields are still transplanted by hand because the method is familiar and gives a uniform stand that shades weeds early.
- This approach often keeps a standing layer of water in the field for much of the season, which is the usual way rice has been grown in lowlands.
- Transplanted paddy can take a bit longer to mature because pulling and replanting seedlings causes a short shock period before plants settle and grow.
- With manual transplanting, a hectare can need roughly 25–30 person-days just to establish the crop, which shows how labour-intensive the traditional method can be.
- Seedlings for transplanting are typically 15–21 days old for wet- or dry-bed nurseries, and 2–3 seedlings per hill is common in many fields.
- Traditional fields are carefully levelled with strong bunds so water depth stays even across the plot, which protects the crop during hot spells and keeps weeds in check.
What is Modern Rice/Paddy Farming?
Modern rice farming focuses on saving labour and water while keeping or improving yield, using approaches like direct seeding, alternate wetting and drying (AWD), and mechanised transplanting.
- Dry direct seeding suits rainfed and deepwater areas, while machine drilling on a smooth, level bed places seed at a shallow depth for even emergence. Because there is no transplant shock, plants settle quickly, but weed pressure is higher, so a clean seedbed and planned weed control are essential.
- AWD changes water management by allowing the soil to dry down to a set threshold — often about 15 cm below the surface — before irrigating again, checked with a simple perforated field tube. This method can save a significant amount of irrigation water without reducing yield, lowering pumping and canal use costs.
- Mechanised transplanting uses a paddy transplanter to set young seedlings at even spacing, reducing drudgery and improving plant population and uniformity. Trials in India show that nonpuddled or no-till mechanised transplanting can match or exceed yields of conventional puddled transplanting while saving labour.
- In some seasons and varieties, mechanised transplanting delivered higher grain yield than conventional puddled transplanting and also eased peak labour demands. Together, these modern practices focus on timing, precision, and efficient water and weed control to increase profits and resilience in a changing climate.
Requirements for Modern Rice/Paddy Farming
Difference Between Traditional & Modern Rice/Paddy Farming
| Aspect | Traditional paddy farming | Modern paddy farming |
|---|---|---|
| Crop establishment | Seedlings raised in a nursery and transplanted by hand into puddled, leveled fields. | Seeds are sown directly in fields, or seedlings are set by a paddy transplanter for even spacing. |
| Labor need | High labour at planting, about 25–30 person-days per hectare for manual transplanting. | Lower labour through direct seeding or machines that handle more area per day with less drudgery. |
| Water management | Often maintains continuous standing water to suppress weeds and stabilise the crop. | Uses AWD to irrigate only when a field tube shows the safe threshold, saving about 30% water. |
| Maturity and stress | Transplant shock can delay maturity slightly as plants re-establish after planting. | No transplant shock in DSR, so crops mature earlier and establish uniformly. |
| Weed control | Early flooding and canopy shading plus hand or rotary weeding in rows. | Planned herbicide program with stale seedbeds, pre- and post-emergence sprays, and mechanical weeding. |
| Yield and uniformity | Yield depends on spacing; proper 20×20 cm rows can raise yield 25–40% over poor spacing. | Mechanised transplanting and precise drilling improve uniformity, with trials showing 3–11% higher yields than conventional puddled transplanting in some cases. |
| Climate impact | Continuous flooding tends to emit more methane during the season. | AWD reduces methane by about 30–70% while keeping yields stable. |
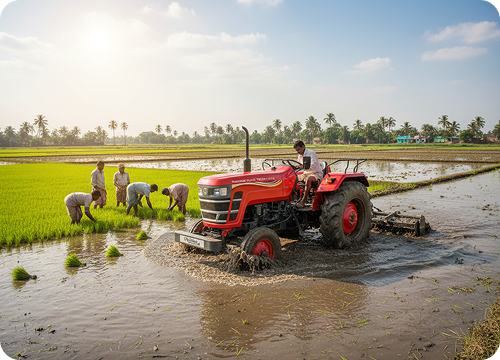
Best Suitable Tractors for Rice Farming
Powerful tractors designed for wetland conditions make field preparation and transplanting easier.
Picking a good tractor for rice starts with a few basics. Wet fields need steady traction, tight turning, sealed systems that can handle mud, and hydraulics that place tools at the right depth. Compact, light machines are handy in nurseries and small plots, while higher horsepower suits puddling, wider rotavators, and heavy haulage. A well-matched tractor makes field work smoother, saves fuel, and protects the soil.
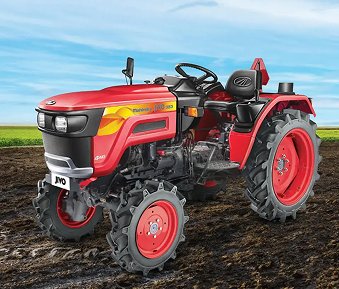
Mahindra JIVO 305 4WD Tractor
The Mahindra JIVO 305 4WD Tractor is a compact yet powerful companion for paddy Read More
Explore More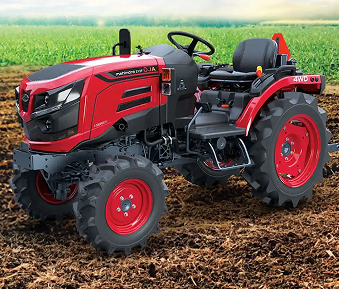
Mahindra OJA 2127 Tractor
The Mahindra OJA 2127 Tractor blends power, comfort, and precision Read More
Explore More
Mahindra OJA 3140 Tractor
Built for versatility and consistent performance, the Mahindra OJA Read More
Explore More
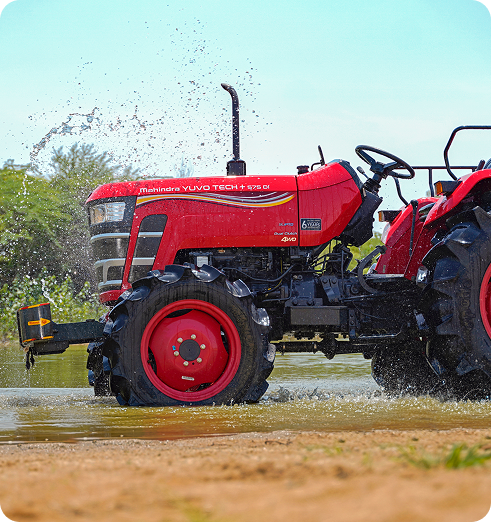
Mahindra 575 YUVO TECH+ 4WD Tractor
The Mahindra 575 YUVO TECH+ 4WD Tractor is a fusion of strength and smart Read More
Explore More
Mahindra 585 YUVO TECH+ 4WD Tractor
For farmers seeking unmatched efficiency in paddy cultivation, Read More
Explore More
Mahindra NOVO 605 DI PP V1 4WD Tractor
The Mahindra NOVO 605 DI PP V1 4WD Tractor is a high-performance Read More
Explore More
Mahindra NOVO 605 DI PS 4WD V1 Tractor
Designed for strength and endurance, the Mahindra NOVO 605 DI PS 4WD V1 Tractor Read More
Explore MoreThe Mahindra JIVO 305 4WD Tractor is a compact yet powerful companion for paddy farming, offering exceptional control in wet and uneven terrains. Powered by a 1489 CC engine and 89 Nm torque, it delivers remarkable strength and stability. Its 18.3 kW (24.5 HP) PTO power ensures efficient operation of implements, while the 750 kg lifting capacity makes heavy-duty work effortless. Built for durability and performance, it’s the perfect choice for modern farmers.
The Mahindra OJA 2127 Tractor blends power, comfort, and precision to simplify tough paddy farming tasks. Offering an engine power range of 15.7 to 25.7 kW (21 to 35 HP) and a hydraulic lifting capacity of 950 kg, this tractor is ideal for puddling, orchard work, and intercultural operations. Its advanced design enhances manoeuvrability in narrow fields, while premium components ensure longevity and efficiency through long working hours.
Built for versatility and consistent performance, the Mahindra OJA 3140 Tractor is an ideal pick for both orchard and paddy field operations. Delivering an engine power range of 26.5 to 37.3 kW (36 to 50 HP), it ensures the right balance between strength and control. The 12x12 transmission system offers precision across tasks, allowing seamless operation even in muddy or waterlogged areas, making it a reliable machine for multi-season use.
The Mahindra 575 YUVO TECH+ 4WD Tractor is a fusion of strength and smart engineering. Powered by a 26.5 to 37.3 kW (36 to 50 HP) ELS engine, it can lift up to 2000 kg, making it suitable for rigorous paddy operations. Its 32.1 kW (43.1 HP) PTO ensures efficient power delivery for heavy implements. Designed with advanced hydraulics, smooth transmission, and superior comfort, it guarantees reliable performance and long-term profitability.
For farmers seeking unmatched efficiency in paddy cultivation, the Mahindra 585 YUVO TECH+ 4WD Tractor stands tall. It delivers an engine power range of 26.5 to 37.3 kW (36 to 50 HP) and 33.9 kW (45.4 HP) PTO power, ensuring powerful yet fuel-efficient operation. Its ELS four-cylinder engine promises superior torque and parallel cooling, while a 2000 kg lift capacity enhances productivity. Comfort, precision, and technology make it a reliable farm partner.
The Mahindra NOVO 605 DI PP V1 4WD Tractor is a high-performance powerhouse crafted for demanding paddy fields. With over 37.3 kW (51 HP) mBoost engine power and 2700 kg lifting capacity, it ensures superior handling of heavy implements. Its dual dry clutch, advanced synchromesh transmission, and efficient hydraulics offer precision in every move. Engineered for durability and operator comfort, it delivers peak performance even in challenging soil conditions.
Designed for strength and endurance, the Mahindra NOVO 605 DI PS 4WD V1 Tractor offers an engine power range of 26.5 to 37.3 kW (36 to 50 HP) with advanced torque backup. Its 2700 kg hydraulic lift and 15 forward speeds ensure flexibility across tasks, while the F/R shuttle provides smoother operation in puddling and wet fields. Featuring fuel efficiency, ergonomic comfort, and precision hydraulics, it’s a true game-changer in modern paddy farming.
Implements & Attachments for Rice Farming
Essential implements like puddlers, rotavators, and seed drills improve soil aeration, planting accuracy, and overall productivity.
A good set of tools turns a tractor into a complete rice system - from soil prep to transplanting, and from harvest to clean storage. The right implement saves time, lowers fuel use, and improves grain quality. Here are practical choices and where they fit best.

For puddling and seedbed prep, the Mahindra Paddyvator RLX is built for rice fields. This rotary tiller mixes soil and water into a smooth bed that seals the bottom and reduces percolation loss. Position‑Auto Control (PAC) helps prevent the tiller from diving too deep or getting stuck, which is common in soft patches. Durable blades reduce downtime, and the even slurry they create supports quick transplanting and fewer early weeds. In fields with uneven patches, this rotavator keeps depth steady so transplant lines remain uniform. It pairs well with compact and mid‑HP tractors for smaller widths, and with 45–60 HP for wider cuts in big fields.
Transplanting is faster and more even with the Mahindra Rice Transplanter MP461. This machine lifts much of the manual load, placing seedlings at steady spacing and depth. Uniform spacing means every plant gets fair sunlight, airflow, and water, which helps growth stay even from the start. Mechanised transplanting trims labour peaks, shortens the planting window, and makes better use of a brief weather break. For farms that face labour shortages during the monsoon, a transplanter like the MP461 keeps the schedule on track without rushing and risking poor placement.
For higher output and longer shifts, the Mahindra Planting Master Paddy 4RO offers a ride‑on, 4‑row layout that blends comfort with speed. The operator moves with the machine, controls spacing and depth easily, and covers more ground per day. Uniform and quick transplanting limits plant shock and helps seedlings catch up fast. When transplant dates are tight, or when multiple plots must be finished before a forecasted rain, a ride‑on system gives the extra push that a walk‑behind may not sustain.
Before puddling or in dry preparation, the Mahindra Spring Loaded Cultivator (Heavy Duty) loosens and aerates the soil, breaking clods and setting a base that puddling can refine. Its robust frame, MIG‑welded joints, and powder‑coated finish suit tough work and long seasons. In rice systems, this cultivator fits well after the previous harvest to break the surface, manage residue, and open the soil for early moisture. A quick pass helps residue settle and keeps the next puddling step smooth and efficient.
At harvest, clean threshing protects the grain and reduces losses. The Dharti Mitra Paddy Thresher P‑55 by Mahindra focuses on efficient separation with minimal breakage. Larger drums, sharp blades, and a strong rotor keep the flow steady, while quality sieves and multiple fans reduce chaff and retain full grains. Simple upkeep and easy cleaning matter at harvest, when time is short and moisture control is crucial. A well‑set thresher saves more grain than many expect and delivers a cleaner sample that mills better and earns a premium.
- A few add‑ons complete the lineup. Cage wheels improve traction in wet soil and reduce slippage during puddling. A simple leveller or board helps smooth the puddle after rotavation, cutting small ridges that slow transplanting. Where precision levelling is needed, a laser land leveller reduces water pooling and improves distribution, which supports even growth and saves irrigation water. For straw management after harvest, a straw reaper or baler helps clear fields quickly, lowering the risk of pests and easing the next season’s start.
- Implement sizing should match tractor power and field size. Compact tractors pair well with narrower rotavators and small transplanters that can turn easily on short headlands. Mid‑HP units can run medium rotavators, 6–8 row walk‑behind transplanters, and small threshers. High‑HP 4WD tractors handle wide rotavators, ride‑on transplanters with larger capacity, and high‑throughput threshers or trailers on soft tracks. Hydraulics with precise draft and depth control keep tools steady in mixed soils and protect against sudden dives in clay pockets.
- Setup and maintenance matter as much as the tool. Sharp rotavator blades reduce fuel use and leave a smoother puddle. Correctly transplanting trays and healthy seedlings keeps the machine feeding smoothly. Thresher settings should match variety and moisture; small tweaks in air flow or drum speed often cut losses sharply. Between plots, a quick wash removes sticky mud from moving parts and keeps bearings and seals healthy. A few minutes of care saves hours of repair later.
- One more point on cost and timing: an implement should pay back with saved labour, shorter field time, and better grain quality. Tools like the Paddyvator RLX, MP461, Planting Master Paddy 4RO, Spring Loaded Cultivator, and Dharti Mitra P‑55 are designed around rice tasks, so each pass adds clear value. On farms with staggered planting or multiple villages sharing machines, a well‑planned schedule and basic spares - pins, blades, belts - keep work flowing through the busy season.
Common Challenges in Paddy Farming & Practical Solutions
Farmers face issues like water scarcity, pest attacks, and fluctuating prices, which can be best tackled through smart irrigation, bio-control, and government support.
1. Uncertain rainfall and water stress
Irregular rains or weak canal flow can slow sprouting, reduce tillers, and leave fewer grains on the panicle. Treat water planning like seed or fertiliser planning so the crop stays steady even when the weather shifts. Build small, tight bunds and fix leaks early so a shallow water layer can be held without waste. Level the field to remove high and low patches that cause water pooling in some spots and stress in others.
2. Floods and waterlogging
Heavy showers or upstream release can submerge plants, reduce oxygen to roots, and invite disease. Quick drainage and sturdy bunds reduce damage. Keep inlets and outlets clean, with a shallow drain channel along field edges. Strengthen bunds and add spill points to safely release excess water. Choose submergence-tolerant varieties in flood-prone belts. Replant gaps promptly after flood recession to maintain plant population. Avoid heavy nitrogen right after floods to limit disease and lodging.
3. Weed pressure (especially in DSR)
Without early control, weeds outcompete paddy for light, nutrients, and water, cutting yield and complicating harvest. Use a stale seedbed: pre-irrigate, let weeds sprout, then destroy before sowing. Apply a pre-emergence herbicide within 1–3 days after sowing in DSR. Follow with a post-emergence spray at 15–25 days as needed. Keep row spacing consistent to enable mechanical or rotary weeding. Do spot hand weeding in patches rather than blanket sprays.
4. Pest outbreaks
Stem borers, leaf folders, and brown planthoppers can cause deadhearts, hopper burn, and panicle damage if not checked in time. Scout weekly and use light traps or yellow sticky cards to monitor trends. Conserve beneficial insects by avoiding broad-spectrum sprays early. Rotate active ingredients to slow resistance. Drain excess water if planthoppers rise, and remove grassy weeds on bunds. Use tolerant varieties and treat seeds to cut early pest load.
5. Disease pressure
Blast, bacterial leaf blight, and sheath blight thrive in dense canopies and prolonged leaf wetness. Keep spacing open enough for airflow; avoid overcrowding. Split nitrogen and avoid heavy late doses that soften tissues. Remove volunteer paddy and grassy hosts near fields. Next to that, choose disease-resistant varieties common in the district. Spray only on confirmed symptoms and time applications to the weather.
6. Soil fertility and micronutrients
Nutrient imbalance shows up as weak tillers, pale leaves, and poor panicles; zinc and sulfur issues are common in puddled fields. Test soil and follow local dose ranges for N, P, and K. Split nitrogen at basal, tillering, and panicle initiation. Add zinc or sulfur where deficiency signs or history exist. Incorporate compost or green manure to build soil life and structure. Keep simple records of doses and dates to fine-tune next season.
7. Salinity and iron toxicity
Salty irrigation or coastal seepage can stunt growth; iron toxicity in lowlands shows as bronzing of leaves. Flush saline fields with fresh water before transplanting if possible. Choose salt-tolerant or iron-tolerant varieties in affected pockets. Improve drainage to lower iron availability in stagnant zones. Apply gypsum in sodic soils as per soil test advice. Maintain shallow, moving water layers rather than deep stagnant water.
Post-Harvest & Storage Best Practices
Proper drying, cleaning, and moisture-controlled storage preserve grain quality and minimise losses after harvest.
- Harvest timing – Correct timing protects head rice recovery and taste. Harvest when most grains are hard and straw turns golden, avoiding too-early cutting that raises breakage.
- Cutting and handling – Gentle handling keeps grains intact. Cut at a steady pace and avoid tossing bundles; keep stacks small and airy to prevent heating in the field.
- Threshing – Clean, even threshing limits broken grains. Adjust drum speed and concave clearance to the variety and moisture; feed crops uniformly and avoid overloading the machine.
- Field drying and transport to the yard – Short field time reduces losses and fungal risk. Move cut bundles promptly to a clean drying area; avoid stacking on wet soil or under trees that drip.
Post-Harvest & Storage — More Tips
1. Harvest timing
Correct timing protects head rice recovery and taste. Harvest when most grains are hard and straw turns golden, avoiding too-early cutting that raises breakage.
2. Cutting and handling
Gentle handling keeps grains intact. Cut at a steady pace and avoid tossing bundles; keep stacks small and airy to prevent heating in the field.
3. Threshing
Clean, even threshing limits broken grains. Adjust drum speed and concave clearance to the variety and moisture; feed crops uniformly and avoid overloading the machine.
4. Field drying and transport to the yard
Short field time reduces losses and fungal risk. Move cut bundles promptly to a clean drying area; avoid stacking on wet soil or under trees that drip.
5. Drying targets and methods
Aim for 12–14% moisture for safe storage. Sun drying on clean tarps works well with thin spreading and regular turning; where the weather is unstable, consider mechanical or batch dryers for steady results.
6. Sun-drying discipline
A few habits lift quality. Keep layers thin (2–4 cm), turn every 30–60 minutes, and cover quickly if clouds build; never dry directly on bare earth to avoid stones and dirt.
7. Cleaning and grading
Removing chaff, stones, and broken pieces earns a premium and protects mills. Use simple sieves, blowers, or aspirators; separate lots by variety and field for traceability.
8. Moisture checks
Moisture meters pay for themselves by preventing re-wetting or under-drying. If meters are not available, bite tests and bottle tests are rough guides, but re-check the next morning to confirm.
9. Bagging materials
Use clean, dry bags - woven PP or jute with liners - for long storage. Hermetic bags help control insects without chemicals when the grain is dry enough.
10. Pallets and stacking
Keep bags off the floor on pallets or bamboo mats. Stack in small blocks with alleys for airflow and inspection; avoid touching walls and roofs where condensation forms.
11. Store hygiene
A clean store is the cheapest protection. Sweep floors, seal cracks, remove old grain and dust, and keep weeds and standing water away from the building.
12. Pest control in storage
Prevent first, then treat only as needed. Use sieves and cleaning to remove broken kernels, and install pheromone traps or light traps.
13. Aflatoxin and mould prevention
Moisture and warmth drive mould. Dry fast, cool the grain, avoid re-wetting, and never store partly dry lots under plastic without ventilation.
14. Record-keeping and lot identity
Simple tags prevent mix-ups and ease sales. Mark each lot with variety, field, harvest date, and moisture; rotate stock so older grain moves first.
15. Short-term storage at farms
If you plan to sell within weeks, keep the grain shaded and away from livestock. You can open stacks on dry days, and this will release trapped humidity.
16. Transport care
Clean the vehicle bed and cover the load against dust and drizzle. Avoid over-stacking that crushes bags and splits seams during bumpy rides.
17. Milling coordination
If you book mill slots early, it will reduce waiting time. Share moisture and variety data with the miller so that the settings match the lot.
18. Parboiling option
Parboiling can improve head rice yield and shelf life if you do it in the correct manner. Make sure there is clean water and uniform steaming. You also need to dry thoroughly afterwards.
19. Safety around machines and fumigants
Safe work protects families and workers. Keep guards in place, disconnect power before service, and use masks and gloves during fumigation handled by trained personnel.
20. Contingency for wet spells
Wet weeks happen during harvest. Use raised drying racks, temporary fans, and small batch dryers; shift work to mid-morning and early afternoon when humidity dips.
21. Community tools and shared services
Pooling equipment spreads cost and access. Shared threshers, dryers, and moisture meters raise overall grain quality in the village and reduce post-harvest loss.
22. Continuous improvement
Each season teaches something new. Note moisture at intake, drying times, broken rates at milling, and any storage issues; adjust next season’s plan based on what the records show.
State-wise Paddy Farming in India
From Punjab’s hybrid varieties to West Bengal’s premium paddies, each state contributes uniquely to India’s rice production.
India grows paddy in many different soils and climates. Water sources and seasons vary by region, so rice is spread across several states. These are the top ten paddy-producing states by output and sown area in 2025.

West Bengal:
15.75 million tonnes from 5.46 million hectares.
The state has a long tradition of kharif and boro rice on its river-dominated plains…
Read MoreThe state has a long tradition of kharif and boro rice on its river plains. In many districts, reliable irrigation allows two or more seasons, which keeps yearly production steady.
.png)
Uttar Pradesh:
12.50 million tonnes from 5.86 million hectares.
It grows both basmati and non-basmati on fertile Gangetic soils…
Read MoreIt grows both basmati and non-basmati on fertile Gangetic soils. The large area under paddy helps the state run procurement and milling at scale.

Punjab:
11.82 million tonnes from 2.97 million hectares.
Strong canal irrigation and mechanisation offer high yields…
Read MoreStrong canal irrigation and mechanisation offer high yields. A tight planting-to-harvest window will offer fast turnaround and better post-harvest handling.
.png)
Tamil Nadu:
9.98 million tonnes from 2.04 million hectares.
Farmers use tanks, canals, and well irrigation. Some regions have higher yields…
Read MoreFarmers use tanks, canals, and well irrigation. Some belts fit in two or even three crops. Focused water management and short-duration varieties help manage changing rainfall.
.png)
Andhra Pradesh:
7.49 million tonnes from 2.16 million hectares.
Coastal deltas enable intensive rice rotations and high productivity…
Read MoreCoastal deltas enable intensive rice rotations and smooth market access. Big mills and nearby ports help reduce logistics costs for farmers and traders.
.png)
Bihar:
6.50 million tonnes from 3.21 million hectares.
Monsoon timing shapes cropping decisions and yields across river plains…
Read MoreMonsoon timing shapes crop decisions and yield stability. Better seeds, proper field levelling, and timely weeding have steadily lifted production.
.png)
Chhattisgarh:
6.09 million tonnes from 3.82 million hectares.
The state has a long tradition of kharif cultivation in its plains and plateaus…
Read MoreKnown as a rice bowl, it has both rainfed and irrigated areas. Community irrigation and local seed choices help farmers handle uneven rainfall.
.png)
Odisha:
5.87 million tonnes from 3.94 million hectares.
The state balances coastal rains with inland irrigation for rice production…
Read MoreThe state balances coastal rains with irrigation in interior regions. Flood-tolerant varieties in risk-prone areas help protect yields.
.png)
Assam:
5.14 million tonnes from 2.46 million hectares.
Rice grows in pre-kharif, kharif and rabi seasons across floodplain areas…
Read MoreRice grows in pre-kharif, kharif, and rabi seasons, where suitable. Short-duration varieties and careful scheduling help avoid flood peaks in vulnerable districts.
.png)
Haryana:
4.14 million tonnes from 1.35 million hectares.
Efficient water control and strong basmati demand drive production…
Read MoreEfficient water control and strong basmati demand support incomes. Mechanisation and timely harvests improve grain quality and head rice recovery.
Paddy Farming Schemes & Subsidies
Government schemes like PM-KISAN and crop insurance programs help farmers adopt better technologies and reduce financial risks.
Several central schemes help keep money moving through the season, cut risk, and improve storage and selling conditions for paddy. Most are easy to access through the local agriculture office or online, and some also support shared village assets like dryers, warehouses, and custom hiring centres that serve entire rice-growing clusters.

PM-KISAN (income support)

PMFBY (crop insurance)

AIF (Agriculture Infrastructure Fund)

Soil Health Card (SHC)
Testimonials
Farmers across India share how modern rice farming techniques have transformed productivity and improved their income sustainably.
FAQs On Rice/Paddy Farming
What is the best time to plant rice? +
Start when rains turn steady and the field can hold shallow water; in most areas, nurseries begin with the early monsoon and transplanting follows 2–4 weeks later. Pick short-, medium-, or long-duration varieties to match the season length and water certainty.
What soil is best for paddy? +
Clay loam or silt loam that holds water is ideal. It puddles well and reduces seepage. Sandy soils can work, but they need more organic matter. They also need careful levelling and more frequent irrigation.
How much water does paddy really need? +
Keep a shallow layer (about ankle-deep) after establishment or follow alternate wetting and drying so the soil never stays flooded for too long. Avoid stress during flowering and grain filling, and drain quickly after heavy rain.
Which variety should be chosen? +
Choose by season length, water availability, and local pest/disease pressure; use what performs well in nearby fields. Try new varieties on a small patch first before switching the whole farm.
Which pests are common and how to manage them? +
Stem borer, leaf folder, and brown planthopper are frequent; scout weekly and act early. Conserve helpful insects, rotate chemicals to avoid resistance, and keep weeds down.
What diseases should be watched for? +
Blast, bacterial leaf blight, and sheath blight rise with dense canopies and long leaf wetness. Keep spacing for airflow, avoid heavy late nitrogen, and use tolerant varieties common in the area.
What is alternate wetting and drying (AWD)? +
It means letting water recede to a safe level before irrigating again, instead of nonstop flooding. This saves water, keeps roots healthy, and usually holds yield steady when done correctly.
When is the right time to harvest? +
Harvest when most grains are hard and the straw turns golden; too early leads to breakage, too late causes shattering. Check several spots in the field, not just the edges.
How should paddy be dried after harvest? +
Dry quickly to about 12–14% moisture on clean tarps in thin layers, turning often; never dry on bare soil. Cover if clouds build, and avoid re-wetting once the grain is nearly dry.
How can yield be improved without big costs? +
Level the field well and use good seed. You need to keep spacing uniform and time fertiliser splits to crop stages. Early weed control and timely irrigation will offer more yield than extra inputs.
How can costs be kept in check and profit improved? +
Plan operations on time, share or rent machines during peak windows, and buy inputs early in small lots to average prices. Grade and store grain properly to earn better rates instead of rushing sales at harvest.
How to prepare a rice nursery for healthy seedlings? +
Choose a well-drained spot near water, apply compost, and level the bed. Sow pre‑germinated seed evenly, then keep moisture consistent. Protect against birds and pests, and ensure seedling age matches transplanting time for strong field establishment and optimum yield.
What is the role of mechanisation in paddy farming? +
Small machines like power tillers, mechanical transplanters, and harvesters save labour, reduce fatigue, and speed up operations. Renting equipment through co‑operatives or local entrepreneurs keeps costs low while improving timeliness and efficiency during critical farming stages.
How can post-harvest losses be reduced? +
Use clean tarps for drying, avoid over‑stacking during storage, and control moisture. Inspect grain periodically for pests, apply safe protectants, and maintain airtight conditions. Proper packaging and timely milling preserve quality and reduce economic loss at the market.
What role do government schemes play in rice farming? +
Schemes offer subsidies on seeds, fertilisers, and machinery. Loan support, crop insurance, and training programs build resilience and improve technical skills. Farmers should stay updated through local agriculture officers to access these timely benefits effectively.
